Grease Inspired: A Sandy Shoot

I have always wanted to do a Sandy inspired photo shoot, from the 1978, 50’s styled classic Grease, and just the other day I realized while folding my laundry, that I in fact had all the wardrobe pieces I would need in order to get the theme across! That is when I ask my husband if he would be interested in shooting some quick photos over the weekend. He was game, so that Saturday off we went to find some bleachers!

Her is my wardrobe break down:

  • Faux Leather Jacket: $12 Sears
  • Leggings: ~$10 years ago at Forever21
  • Off the shoulder Pinup Girl Clothing top: $10 Thrifted
  • Belt: Came on another dress
  • Shoes: $8 Thrifted

For a quick idea and ~45 min on a football field, I am pretty happy with how it all turned out!

IMG_1181_EDIT_WEB

IMG_1042_EDIT_Square

IMG_1011_EDIT_WEB

IMG_1068_EDIT_WEB

Let me know what you think & hope you’re having a happy weekend!

-Penny

IMG_1081_EDIT_WEB

Like a Virgin; My 1st Pinup Contest

Well I did it. I entered my very first pinup competition, the Rose City Pin-up Queen Contest. It was the first year for this competition and the submission was all online.

I was very hesitant to enter, as I wasn’t sure how much I liked pitting myself against other lovely ladies. In the end I decided that it would push me out of my comfort zone, possibly introduce me to some new friends and just perhaps open some doors for future photo shoots.

Though I have being “doing” pinup style for quite some time now and taking my own photos for this blog and my Instagram, I had yet to shoot professional photos that I could use for this contest. So with just days until the submission deadline, I grabbed my iPhone, our wedding photo backdrop and 2 lights given to me by a friend and headed for my backyard. Talk about waiting until the last minute!

Luckily, in my line of work I use Photoshop frequently so I knew I could do some quick editing and adjustments just as long as the lighting was 1/2 decent. Below you will find my 2 submitted photos with their before and afters.

before_after1

For the first photo, I was inspired by the old Coca Cola ads and the often traditional plain (but vibrant) backgrounds used in many pinup imagery and photographs.

before_after2

For my second photo I went with 1940’s glamour. I had this backless, rhinestone, navy dress that was gifted to me years ago and it screamed for a black & white glamour shot! Some hair brightening, lay on the right black & white filter with some added vignette for drama and voila! 1940’s. (I was also really digging the edgy hairstyles of the time period…can ya tell?!)

With my 2 photos prepped and ready to go, I sat down to write my essay questions…

Question 1: Tell us about yourself.

Growing up in Oregon where you were more likely to find tie dye toilet paper than a pair of rhinestone earrings, I would sit and dream from the comfort of my grandmother’s sofa about a time of sculpted hairdos, ravishing red lips and even sexier cars, all the while the sounds of the man in black and the king seduced me from the background.

From then on I knew what I wanted, and I was determined to never let a lack of funds keep me from living the glamourous life I craved.

Now I preach the gospel of an affordable pinup life, to show ladies everywhere that if you have the desire, determination and a dash of creativity, you too can be the pinup girl of your dreams!

Question 2: What is your favorite pinup or vintage inspiration?

The inspiration that has had the most impact on my pinup journey has been the work of the late Alberto Vargas. The way he depicted such darling sensuality struck such a cord in me that I used his painting of the blonde pinup in pink as the inspiration for my tattoo back piece.

Question 3: How would you represent Portland as Rose City Pinup Queen?

If selected as the Rose City Pinup Queen I would use every opportunity given to me to provide encouragement, support and promotion of this utterly wonderful and underrepresented culture that I know once introduced in a welcoming and non-intimidating fashion can provide ladies with increased self-confidence, poise and daring that is at the heart of each and every pinup.

After submitting, I made sure to post a few photos on my Instagram feed and get the word out to my Facebook friends. They were all super supportive and I am very pleased to say that I received 2nd place! I was shocked! This 2nd place win gave me the courage to set up my first pinup photo shoot and really try my hand at pinup modeling. Stay tuned for my next post to see inside my first pinup photo shoot!

Until next time, don’t be afraid to stretch yourself. You never know what exciting things await you!

-Penny la Pêche (The Pennywise Pinup)

haveyouvoted

DIY Victory Rolls!


VR Title Page

Alright! So here she is, my photo tutorial to Victory Roll goodness! Let’s jump right in! Below are all the supplies you will need to create the above look. (Besides bobby pins….yup I forgot to photograph those…oops!)

VR Supplies w Numbers

  1. You will need a teasing brush, like my pink one. Here is where I got mine.
  2. You will need a Boar Bristle Brush.
  3. I really like using Suavecita Pomade to smooth my fly-aways.
  4. Some Duck Bill Clips will definitely come in handy.
  5. As will Pin Curl Clips.
  6. Your Favorite Hairspray.
  7. 1″ Curling Iron.
  8. I set mine to about 360F.
  9. Now let’s get to the real step 1! Brush out your hair.

Collage 2 VR w Numbers

10. Part your hair at the highest point in your brow.

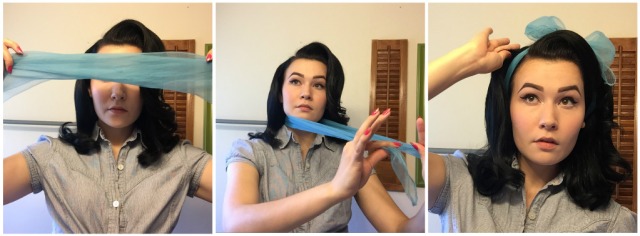
11. Make a part across your crown where a headband would sit.

12. Take a 1″ section of hair on the side with the most hair after it was parted and against the headband part.

13. Curl it, rolling the curl backward.

14. Once hair is thoroughly heated, remove it from the iron and pin in place with small pin curl clip to cool.

15.Section the hair in front of the curl you just made so that it goes from your original high eyebrow part to your other high eyebrow. Clip this section out of the way with one of your duck bill clips as we will get back to it later.

16. Curl the remaining hair in front of your headband part backwards, sectioning the hair as needed for proper curling.

17. Remember to place the pin curl clips in, once you remove the hair from the iron.

18. Repeat step 16 for the other side of your head.

Collage 3 VR w Numbers

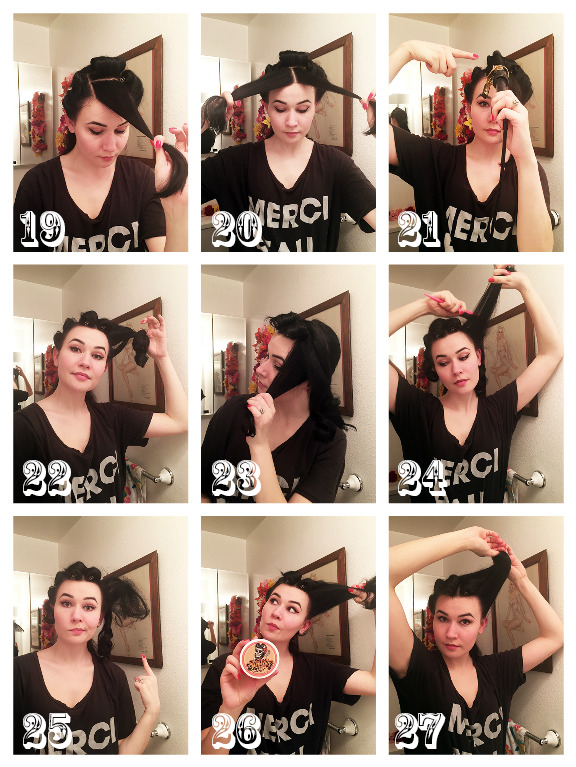
19. Getting back to that neglected center front section…

20. …separate the hair into manageable curling amounts.

21. Curl each section AWAY from your original high eyebrow part.

22. After pinning those curls in place to cool, unpin the first side you curled, as they should now be cool.

23. Take a section closest to your face and tease the hair with your teasing brush making sure you are behind the hair.

24. Keep teasing that hair together chunk after chunk.

25. It will begin to look something like this.

26. Grab your Suavecita Pomade and take a little in your hands. Run it over the front of the hair to smooth fly-aways. Brush any surface lumps with your teasing comb.

27. Roll your hair with your fingertips towards the center back of your head. Remember to keep the roll full. Think cinnamon roll, not tunnel.

Collage 4 VR w Numbers

28. Pin you roll in place using hair colored bobby pins.

29. Now that those center front section curls should have cooled, lets take them out and form your center roll. Begin by teasing the underside of the hair which should be closest to the roll you just completed.

30. Smooth with teasing brush and pomade and pin in place with your bobby pins.

31. Tease your final side until it looks like this. This side will need more volume to make up for the lack of hair due to your side part.

32. Smooth with teasing brush and pomade and pin in place with your bobby pins.

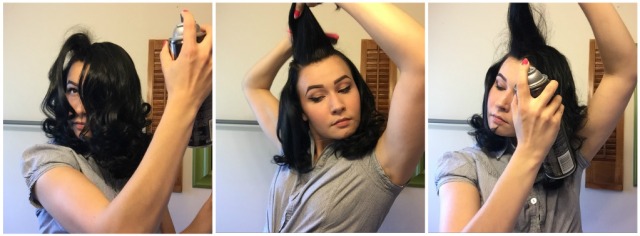
33. Hairspray your rolls.

34. Now for the back! Almost done!

35. Take a section of hair directly behind your ears and curl it forward, holding the iron vertically.

36. Do the same on the other side.

Collage 5 VR w Numbers

37. With the remaining hair at the back of your head, curl it all downward. Pin to cool.

38. Once cool, take out your pins and brush the underside of your hair to give it volume. Smooth the top if needed and use a very small amount of pomade at the ends of your hair. Too much at your roots will make your hair greasy and stringy looking.Yuck!

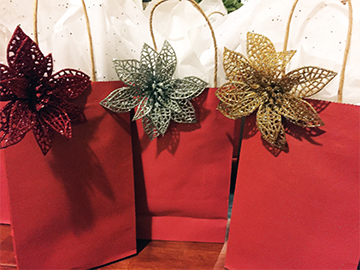
39. Give your hair a good ol’ final spray and add some hair flowers : )

VR Real Final w Numbers

40. And you are done! Hit the town or go grocery shopping. Just go do you!

Next week we will go over Bumper Bangs. Thanks for reading, and if you try this out I would love to hear your experience with it!

Happy Rollin’!

-Pennywise

VR Thumb

My 1st Hair Class!

Oh my lord! It has seriously been forever since I have had a chance to blog! If it wasn’t work travel, family, friends, cleaning, cats, it was something else, but thank goodness… I got this whole last week off to catch up!

So I LOVE learning. If there is a better, smarter faster, less expensive way to do something, I want to know about it! Not only do I want to know, I want to tell everyone I come in contact with. Spread the wealth right? A couple of weeks ago I had the opportunity to share what I have learned so far in the way of teaching my very first “Vintage Holiday Hairstyling Class”!

HolidayHSF


At this class I taught 3 different styles: Victory Rolls, Bumper Bangs and what I call Glamour Waves. (All of which I will blog about in more detail the up coming posts, providing picture tutorials and diagrams. ) My hair models were the following 3 lovely ladies…

Hair Models

On  the left we have the adorable Jamie, the wonderful middle is Rebecca and on the end, enjoying her tropical beverage, we have Meghan. I have had the pleasure of working with Jamie’s hair before as she has modeled for me in the past, (see below… Girlfriend knows how to weerk! Yes, she is on a tractor.).

Lanae Lingerie Sherbet 2

As for Rebecca and Meghan, I have never worked with their hair, so it was a test for me as well! I put out some feelers a few weeks before the class to see if anyone would be interested in something like this and I had 10 ladies sign up! I was so excited. As for the location, the wonderful Lisa Hahn volunteered The Heart of Rock Farm to hold the event, and we were set! Until we hit our 1st bump in the road, or may I say river in the road?…..

Click and watch this!

Yep, that is Lisa and Phil. We found out at 3pm on Friday that the rain wasn’t letting up and one of the roads to the farm had already become inaccessible due to a river forming over it! Worried that my 10 ladies would be left without a class and no good options for rescheduling due to the holiday season, Rebecca and I began brainstorming where we could hold something like this on such short notice. Then we had it… an apartment club house! Rental of a complex’s club house is normally very cheap since they include it as part of the tenant’s rents upon moving in. The only problem was we didn’t live in an apartment. 2nd bump : /

That is when we reached out to my soon-to-be mother-in-law. Her club house was beautiful and only $25 to rent as long as you put down a deposit to make sure you don’t trash the place. This sounded perfect and she called to see if we could rent it out…it was already booked. 3rd bump : /

That’s when Wendy (soon-to-be mother-in-law) jumped in and saved the day! She offered up her place for my class. I couldn’t believe it! We had a spot! Not only was it a dry spot to talk hair, it is immaculately vintage. To explain to you how lovely her place is, just imagine a giant tin coke billboard from the 1940s. It’s sorta like the one below but with only 1 gal and it fills up an entire living room wall! This place is perfect.

Image Credit: Terapeak Inc.

rare-vintage-1941-original-large-drink-coca-cola-coke-sign-billboard-60-x24-e9dce78c9865aeed0a205c16824340b5 (2)

Out of the 10 ladies registerd, 9 showed up! I couldn’t believe it! I figured we might get 4 if we were lucky due to the horrible weather and flooding of roads. The only lady that couldn’t make it was dealing with a flooding basement. Talk about Oregon rain.

After 3 bumps in the road we were finally doing it! The class registration fee was $25 which I used to get milk, cookies and everything (besides a 1″ barrel curling iron) that the ladies would need to start trying out these hair styles on their own.

goodiebags


The bags included:

  • 1 Travel hairspray (Bead Head Hard Head Hairspray)
  • 1 Teasing brush
  • 12 Pin curl clips
  • 2 Duckbill clips
  • 30 Bobby pins
  • 2- 5 gram jars of pomade (Suavecita)
  • 1 Christmas card from me : )

Check in next week to see how I used these products in the pinup transformation!

Feeling grateful for my amazing family & friends,

-Pennywise

pizap.com14508329270514

A Very Burlesque Halloween

Well we have just finished up with the most wonderful time of the year. No you didn’t miss Christmas (puke noise). If you know me, you know that when August rolls around it is time to start planning costumes. Normally I will sew and make something completely from scratch and Tanner will ever so sweetly be whatever I suggest. (He’s a keeper.) This year was completely different! I told Tanner that he got to pick out our costumes. His choice?…. Marilyn Manson and Dita Von Teese. Sorry Mom ; )

Photo Credit: Haineng.co

Photo Credit: Haineng.co

Now if you have been living under a rock or are simply not into shock rock or burlesque here are a few links that you may want to check out…

Manson: The Beautiful People

Teese: Perrier Advertisement 

And you’re back. Amazing right?!

I was honestly a bit concerned this year that my costume would be too much like my everyday look just much sexier. I already have black hair and do a red lip and cateye everyday so I thought it would look like “Oh great, she went as a slut for Halloween.” Tanner convinced me that I could make it awesome. So I went for it. Here is how it turned out…

Not too shabby if I do say so myself! I determined what I could do with my makeup to make my face look a bit more like hers, so I flattened out my brows, thinned out my lips and added her classic beauty mark. I also used some false lashes. I pinned up my hair in vintage waves and styled it slicked with Suavecita Pomade.

I used my satin underbust Orchard Corset CS-426. Which is a hell of a deal for $79! If you are looking for a corset, I HIGHLY recommend it. I then went searching for a bargain on some Dita lingerie, particularly the Her Sexellency Overwire Bra. I have had my eye on this piece for months, and I actually found a smoking deal at ASOS! 50% off babay! I also wore sheer nylons under a pair of silk “granny panties” for added warmth and coverage. On top of those nylons I added cuban seamed thigh highs that I purchased at a local shop, but can be found here at Walmart.

I found some great gaudy rhinestone earrings locally and a hair comb for $6. I also purchased some long satin gloves for $9.99 from a Spirit Halloween Store. The final 2 touches to my costume were a massive feather boa and ballet pointe shoes. I purchased 4 100g boas for $8.50 each and sewed them together to make 1 lush monster of feathers. Just 1 super full boa goes for a whopping $100! I saved myself $66 by making it myself! I bought pink satin pointe shoes for $16.50 and sprayed them with black dye and used red leather paint on the bottoms to get the faux Louboutin look, to mimic Dita’s gorgeous pairs.

It was such a fun evening! I’ll leave you with a few more photos of some fantastic costumes. The first is some good old brotherly love. (Tanner’s little bro is the sailor.)

A little Rocky Horror, Dr. Frank-N-Furter for ya.

An event that happened Nov. 22nd (my birthday) in 1963. Too soon?

Thanks for stopping by! Until next time,

-Pennywise

Vintage Trouble: Something about that sound!

A couple of weeks ago Tanner and I, along with his younger brother and his brother’s roommate went out on a Wednesday to go see my favorite live band of all time. Yup. They are fucking great.

It was Labor Day weekend around 2 or 3 years ago that a group of us went up to Seattle to attend Bumbershoot; a 3 day long music and arts festival located at the Seattle Center. When we went it was the cheapest festival around and a smokin’ deal!! As per my usual routine before a festival, I went ahead and did some research looking up every band that I had never heard of that was going to be playing there. How else do you expand your musical horizons?!

While listening to one particular band, I found myself wanting to get up and dance. They had this blues-y/rock thing going on that had me hooked! I took note of when they were going to be playing and moved on to the next artist on my list. Later that week we left on our mini-road trip up to Seattle.

Mid afternoon I pulled out my list and noticed that the “blues-y/rock-make-me-wanna dance” band was going to be playing soon. I quickly turned to the group and said that this was my one request for the trip and we needed to head to that stage NOW! They all hesitated for a second and threw out some “but I’ve never heard of them!… We could just go grab a beer… We could just go see [insert boring, popular, not that good band here]” I said I was fine if we all split up, but I WAS GOING TO SEE THIS BAND! Needless to say my determination swayed the group and everyone headed there with me ; )

Go ahead and click THIS link, then we can continue.

The lead singer Ty Taylor is reminiscent of Otis Redding, with the moves of James Brown and a contemporary vibe all his own. At our first concert he ripped is suit jacket he danced so hard! The man is a performer, hands down.

Guitarist Nalle Colt, (who may or may not remind me a tad of Viggo Mortensen, who may or may not have been a crush of mine when I was 15) is an incredible guitarist. (Tanner’s little brother and I we able to snag a photo with him at Bumbershoot later that night! Thanks dude, if you ever happen to come across this!)

Bassist Rick Barrio Dill’s style and groove is soooo good. My biggest pet peeve in most bands is when bassists stand like statues with an “F my life” look on their face. Not sure why that is? I know they are playing some mad riffs, but really? I want to see them having fun too! Dill brings it. Nuff said.

Drummer Richard Danielson is fantastic and as an added bonus a nice little old wild west eye candy too if you know what I mean. Tombstone anyone? ; ) Click on his name to checkout behind the scenes of his drum set-up!

All in all, this band is ridiculous. To check and see if they are  coming to a city near you, follow this link: Show Schedule

Happy listening!

-Pennywise

The Usual Suspect; My Daily Pinup Hair

In the last post I showed you how I go about my daily makeup routine. While I was documenting it I decided to let you in on my almost daily hair routine as well! To keep things interesting and to challenge myself, I try about 2-3 times per week to mix it up with different swirls, twirls and curls. For the rest of the days when I have say an early meeting , or I’m just not wanting to put in all that effort I do this. What fascinates me is that I am continually happy with it, time and time again! I really haven’t had a bad hair day in quite a while since I figured out this set!

Now this may not work for everyone but I highly suggest you give it a try!

Step 1) Grab your teasing brush or comb, (I got this one for $2.99 at Sally’s), and give yourself a deep side part. I stay around the highest point of my brow. I feel like Morticia Addams with my au’Natural’ hair!

Step 2) Take a 1 inch barrel curling iron, (mine is a here), and turn it up fairly high. I go about 3/4 of the max setting. The higher the setting, the less time you have to have it in your hair. Remember hotter = shorter time. Also make sure not burn yourself!

Step 3) Grab the front section of your hair around 1″ deep and curl it going forward in your iron. I let mine sit for about 10-15 seconds. One the hair on your iron is hot to the touch, slowly release it keeping the curl in that single roll with your other hand.

Step 4) Grab a little double pronged clip, (I use these), and pin your curl into place right where your curling iron used to be. Next grab a section of hair 1″ deep right behind where you just placed your first curl.

Step 5) Curl that second section of hair just like you did the first one, curling towards the front and pin in place with one of your metal clips. No we move onto the sides. Just as before, take a 1″ deep section of hair over your ear and curl this towards the front. Pin in place.

Step 6) Again grab a 1″ deep section of hair right behind the area you just pinned above your ear. Curl it forward and pin it in place. Now move on to your other side. Curl the 1st & 2nd row by your ear forward and pin them in place.

Step 7) Now we start down the back! Grab a 1″ section at the top of your head and curl it down. Pin in place. Continue curling the rest of the remaining hair downward and pin it all in place. Once everything is curled and tidy, take some hairspray and give it a quick once over. I use Tresemme Two Freeze Hold Hairspray. This will help it set while it cools and if you have stick straight hair like me, anything helps!

Step 8) Once all your curls have cooled, (about 10-15 min), gently take out all your clips. This will leave you with ringlets. Grab the 1/2″ section of hair that is right next to your part on the top of your head. With your teasing comb, begin to back comb it down toward the roots on the underneath side of the hair. This is the side that will be laying down if you let go ; )

Step 9) Once that little section is teased enough to stand up a smidge on it’s own, give it a tiny spritz on the underneath side, by the teased area. Next, grab another 1/2″ section of hair directly next to that teased side and tease it at the roots. Make sure to hold the section that has already been teased so they begin to come together. Each time you add another little 1/2″ to the growing tease mound give it a little spritz.

Step 10) Stop teasing once you have reached approximately the equal distance from your ear, as your part is on the other side. You should be looking pretty foxy by this point!

Step 11) Ok so what now? Well, let’s start ramping up the flat sides a bit. Add a little teasing on the underside of the flat section, making sure to spray it each time and continue holding the previously teased sections, creating your dangerous looking mounds. Now we sculpt. Take your same teasing comb and gently brush the top of your mounds to start to smooth is all out.

Step 12) Make sure that while you are smoothing, not to lose that nice wave volume you just worked so hard to get! You can puff it back up with the tail end of your teasing brush if you find it getting flat. Smooth the other side and make sure to brush the back of your hair and the ends of your hair as well. Consistency people.

Step 13) Pick you hair accessory. This time we are going with a scarf. Even the scarf out towards the side you eventually want the bow to sit. You don’t want to have to adjust it once in place. Let’s be real, it will just fuck up your hair.

Step 14) Adjust what you need to. Grab some bobby pins and to hold you scarf in place and secure it right above your ears. Once you pull your hair forward on the sides a bit you won’t even see them.

Step 15) Give it a good one over with your hairspray, put on your lips and go take a selfie! That’s it!

Hope this was helpful! Until Next time!

-Pennywise

Makeover Monday!

It’s Monday and I am not at work. Wahoooooo! I decided to use today to get some stuff done around the house and to share with you my daily makeover. Get excited because you are about to see some CrAZy faces! Normally I get ready in about 40 min, including hair, makeup, and clothes and being in the apparel world, it’s the clothes that end up taking the most time!

Let’s get started!

Here is me right out of bed, (I showered last night). I have eaten breakfast and brushed my teeth but that is it. A good thing to point out is that my hair is naturally stick straight. I have a lot of hair but it is fine and silky and definitely not the what I am going for! Haha.

First thing I do is put my hair up & take some gentle eye makeup remover and with a few q-tips, get rid of the excess mascara that has migrated under my eyes as I have slept. This stuff is Almay Oil Free gentle eye makeup remover.

Next I take some Simple Revitalizing Eye Roll-On. This helps with bags and doesn’t contain any harsh perfumes or dyes. It also feels really good if you keep it in your fridge! I roll it on the top lid as well as the under eye area.

Step 3 is foundation. My current favorite is Mary Kay TimeWise Matte Wear Liquid Foundation. I use color Ivory 3. When putting on foundation always make sure to blend it down on to your neck and into your hair-line. Nobody wants to look like they are wearing a mask!

Step 4 is cover up. I always go one shade lighter than my skin, as it can double as a highlighter as well. This stuff is Covergirl Fresh Complexion Concealer in color Classic Ivory. I dot it under my eyes, on any blemishes and red looking areas. Thankfully my skin has been pretty nice to me lately so there aren’t too many. When applying anything to your face, make sure you are being gentle. Constant rubbing and pulling causes wrinkles. Be nice.

On to the powders! I try to stay as matte as possible throughout the day and this really helps! This stuff is Covergirl Professional Loose Powder in Translucent Fair. I use this to set my foundation and concealer. I am also not brand specific when it comes to translucent powders. I’ll buy which ever brand is on sale. “Pennywise” remember ; )

Seeing as it is summer and I buy my makeup in bulk during sale times, my current foundation is a bit too light for my summer sun-kissed skin. In order to balance it back out with the rest of my body I take a little bronzer and lightly brush some around my jawline, neck and temples. This is ModelCo Bronzer.

The final powder in my foundation trio is blush! I splurged and bought myself the Urban Decay Afterglow in color Score. It’s $26 and totally worth it! I sweep it from the apples of my cheeks up to my temples.

Step 8 is eye shadow. I am constantly running out of my pale pink colors in my eyeshadow palates, but I picked up this little individual one from Sally Beauty Supply a few months back and it has really come in handy! My normal palate is theBalm NUDE’tude. I dust the pale pink all over my lid and up to my brow.

Next I take the “Seductive” color from the NUDE’tude palate (which is a medium gold/brown color) and dust it in my crease and a centimeter above, blending it into the pale pink.

Highlighting! I take Sephora Aspen Summit No. 23, which is just a bright white shimmery eye shadow, and brush some right under my brows, next to my tear ducts and on the highest part of my cheekbones.

Step 11 means it is time to blend. I take my little blending brush without anything on it and lightly brush it over my lid blending the highlighted area with the darker shadow that I have placed in my lid’s crease.

One statement piece of a pinup’s wardrobe is her brows!! I recently switched to Anastasia Beverly Hills Dipbrow Pomade in color Ebony and my life has changed. With this stuff you never run the risk of sweating your brows off and with an angled brush it goes on so smooth and even, it is very easy to control. You also have to use so little of it at a time it lasts forever! $18 at Ulta. If you do happen to mess up, just grab a couple q-tips and wipe the area clean.

Step 13 is the other pinup staple; cateye winged liner! I have been using NYX Collection Noir Liquid Black Liner for about 1 year now and I love it. If you want to know more about this stuff, checkout my review HERE!

14…So close!! My future Mother-in-law actually introduced me to this one! I have been really loving the Maybelline The Falsies Volum’ Express. $7 and works great! I put it on top and bottom lashes.

Step 15 is key to keeping it looking fresh all day! I recently started using NYX Matte Finish Makeup Setting Spray and I can really see a difference! What is setting spray? Well I would describe it as a kind of hairspray for your face. When I use this stuff I don’t have to blot away oils until around 3pm each day after applying the finish at 8am that morning. That is pretty good if you ask me!

Step 16! All that is missing is the BIG, BOLD Lip!! Since this is my favorite and to keep my clothing stain free I always save my lipstick as the finishing touch! My go-to as of late has been Maybelline Color Sensational in color 635 Very Cherry. I first line my lips in a clear wax liner. This is handy because it goes with any shade of lipstick and keeps color from bleeding during the day. I use Rimmel Moisture Renew Universal Transparent Liner.

Thanks for reading! Check back later this week for a picture tutorial on how I do my basic hair set as seen here!

Happy Monday!

-Pennywise

Car Shows… Guaranteed to Satisfy!

This little lady is gettin’ reeeeaaalll “penny-wise”! With a little less than 1 year until the wedding, Tanner and I are going to pinch where ever we can, in order to save up for our dream day! The topic that has really been on our minds lately has been “what can you do for free?” Answer…not a ton, but wait…

Living in the Pacific Northwest there isn’t really a big rockabilly/pinup scene. In fact, I am actually the only pinup style chick I know in the area :/ Thankfully one of our favorite past times this summer has been attending local car shows. It’s where I find I feel right at home! Photo above is us just before heading out to the last show : )

How Car Shows Work:

  • They are often put on by local car clubs or auto shops.
  • Each car being shown pays an entry fee, which goes to the clubs or local charities.
  • The cars can enter competitively to win a variety of awards.
  • The public can then view the cars on display and have a meet & greet with many of the owners for free or a small donation!

Most often the shows have retro rocking music playing, and sometimes there will be food vendors and a kid’s area. All the people that we have met thus far have been super friendly and nice!

Here are more of my favorites from the last car show we went to in downtown Gladstone, which was hosted by the Associated Fords of the Fifties

The owners L.O.V.E. to talk about their “babies”! Also, if you enjoy dressing up as much as we do, it is appreciated there as well : ) My favorite compliments come from the older crowd who tell me things like: “I remember the days when people used to dress like that! You look just wonderful!”

Don’t know a thing about cars? Who cares! If you can appreciate the artistry it took to originally design these beauties and the passion and patience it takes to maintain them to this day, you belong at a car show.

If you are interested in car culture or a vintage lifestyle, classic car shows in your area is where you should look. My favorite part of going to the shows, is that it gives me another excuse to dress up!

Hope you are having a great last few days of Summer! (Faux nose pick for the win!)

-Pennywise

Our Rockabilly Inspired Engagement Shoot

Ahhhh! We just received our engagement photos!!! About 3 weeks ago, Tanner and I packed up the ’52 and headed out to wine country to meet up with two of the most incredible photographers!

Adam and Laura Queen from A Plus L Photo are a husband and wife duo that recently relocated to Portland, Oregon. Their romantic style and ability to capture light and intimate moments made them the perfect fit for us. When I first reached out to Laura with the proposition of a vintage, rockabilly themed shoot, she was all in! Over the next month we went back and forth trying to determine the best time and location for the shoot. In the end we figured that a sunny, Sunday evening down an old dirt road would be just the ticket.

As the day grew near we realized that our “sunny Sunday” was turning out to be more like a “sun stroke Sunday!” With the temperature reaching 95+ we knew this was going to be a bit of an ordeal, but we were a couple on a mission! I gathered up all the face powder I could find, along with extra deodorant and told Laura if they were still down, we were all in.

We decided to meet at a little diner out an old country road and from there, just drive until we came to a dead-end spot that could work for our shoot. Just as we were reversing to leave the parking lot, a coworker of mine walked up to the car! As soon as he found out what we were up to that day, he immediately offered up his friend’s winery as a shooting location! He said they had just closed up tastings for the day and he would call ahead and tell them we were on our way. Just like that we had an entire winery to ourselves!

Bergstrom Winery ended up being more beautiful than we could have imagined! Thanks to the amazing generosity of the winery’s owners and my incredible coworker, our engagement shoot location was absolutely perfect. If you find yourself in Newberg, OR, make sure to check them out!

Just a few more!! Fun fact: The dress below was found in my grandmother’s house after she passed.

Hope you enjoy the photos! If you are in need of amazing photographers check out A Plus L Photo. I couldn’t recommend them more!

-Tanner & Pennywise